
Tuesday, April 26, 2011
Pink Skulls Double-Decker Hairbow Now Available!
I finally got the pink skull ribbon bow barrette from the post Sugar, Spice, and Skulls up on Etsy! Buy it before it goes - it's one of a kind! (More cute ribbons in a similar design to come.) Check it out!

Saturday, April 23, 2011
Sushi!
Tonight's adventure: sushi! We cracked out the wedding-gift sushi set (only a year and a half later ...) and got to it. The hubs and I have been dreaming about hosting sushi parties, so we figured step 1 was actually figuring out how to make it. And you know what? It's ridiculously easy.
One caveat, for the sushi gourmet - when I say "sushi", I mean "maki rolls." More specifically, I mean maki rolls made without any raw fish. I love raw fish in my maki at very high-quality restaurants, but I just doubt that I can get and safely work with sushi-grade fish when I'm 2000 miles from the ocean.
So, anyway, veggie maki rolls are really easy!
We hauled out the bamboo mat, which I thought would be hard to work with but wasn't. Our mystery sources (i.e. YouTube) recommended covering the mat in plastic wrap to minimize sticking. Sticky sushi rice is really, seriously sticky. Who would have thought.
Then lay out a sheet of seaweed. We got some really nice nori at the local co-op. My husband swears everything there is organic, although I'm skeptical about the existence of certified organic seaweed. Apparently darker color = better quality. (Thanks again, YouTube.)


Fill a small bowl with water and get your hands wet. This is by far the most important step if you don't want to wind up with sushi rice stuck all over EVERYTHING. Then, with wet hands, grab a hunk of your prepared sushi rice (we used this recipe from Alton Brown) and press it firmly into your nori.


 Go pretty much all the way to the edges, but leave a little space - maybe half an inch or so - at the end, so you won't squish rice out the end when you make the roll.
Place fillings at one end (we made cucumber roll for me, and Philadelphia roll - cream cheese and lox - for the hubby.)
 Then roll! Your first roll you need to move somewhat quickly - don't rush, just don't hesitate. You're trying to completely enclose the fillings. After you roll, make the roll tight by squeezing the bamboo mat at the bottom of the new roll (where my fingers are in the pic below.)

Repeat until you're all the way at the edge ...

Then lift the mat away, and voila! It's like magic!

To make eight even pieces (we tried six the first time, and the pieces were HUGE. We couldn't fit them in our mouths. This resulted in some hilarious photos of my hubby with half a piece hanging out of his mouth, which I will not be sharing because I like being married.) Anywho, to make eight even pieces, we're going to cut the roll in half several times. Use a wet knife to avoid sticking! First cut it in half once and line the halves up.


 Ta-dah!


One caveat, for the sushi gourmet - when I say "sushi", I mean "maki rolls." More specifically, I mean maki rolls made without any raw fish. I love raw fish in my maki at very high-quality restaurants, but I just doubt that I can get and safely work with sushi-grade fish when I'm 2000 miles from the ocean.
So, anyway, veggie maki rolls are really easy!
We hauled out the bamboo mat, which I thought would be hard to work with but wasn't. Our mystery sources (i.e. YouTube) recommended covering the mat in plastic wrap to minimize sticking. Sticky sushi rice is really, seriously sticky. Who would have thought.
Then lay out a sheet of seaweed. We got some really nice nori at the local co-op. My husband swears everything there is organic, although I'm skeptical about the existence of certified organic seaweed. Apparently darker color = better quality. (Thanks again, YouTube.)


Place fillings at one end (we made cucumber roll for me, and Philadelphia roll - cream cheese and lox - for the hubby.)


Repeat until you're all the way at the edge ...

Then lift the mat away, and voila! It's like magic!

To make eight even pieces (we tried six the first time, and the pieces were HUGE. We couldn't fit them in our mouths. This resulted in some hilarious photos of my hubby with half a piece hanging out of his mouth, which I will not be sharing because I like being married.) Anywho, to make eight even pieces, we're going to cut the roll in half several times. Use a wet knife to avoid sticking! First cut it in half once and line the halves up.

Then...


(Note that these are the first batch of uber-huge rolls. That's why they're already starting to unroll - the small ones, which we cut smaller and used less rice for, held together much better.)
It looks beautiful like this for a few minutes, but then it's so nummy that it will shortly look like this:

Sunday, April 17, 2011
Sugar, Spice, and Skulls
I just got a stash of THE MOST ADORABLE ribbon from one of my fave Etsy sellers, chickadee supplies. (That means you'll probably be seeing several posts in which I try to find the best possible project for my lovelies.) This pink and gray skulls pattern inspired me to make a double-decker hairbow. So here it is!

And here's how I made it.
First, I measured out three pieces of the pink satin ribbon. I made some loops in my hand to get a general idea of how bit I wanted them. (This was maybe not the best idea. Stay tuned ...) Don't worry about making the edges nice; they won't show.


Mark the middle of each piece, and fold one side to the middle. You can stitch or hot glue it in place. I prefer hot glue, because while it's not important to have the edges be pretty, it is very important to have these folds lie perfectly straight. If you're at even a small angle, the bow will look wonky. I find it's easier to nail the loop in place with hot glue than with thread.

Repeat with the other side.
 Then do it again with the remaining pieces. Once they're all done, you can glue or stitch them together. Make sure to keep the glued/stitched edges facing the same way (all up or all down.) That way, you can hide them all on the bottom later.
Except, my three-piece bow looks kind of sparse and depressing.

Time for one more ribbon.

Much better!
... Except for one thing. This bow is enormous. Way too big to put on somebody's head, especially if that somebody hasn't started reading chapter books yet.
 It's way bigger than the spool of ribbon, and almost as big as my scissors. Oops.
I cut four new pieces, this time 8" long. Way better. Then I repeated the entire process above, but with my skulls ribbon. And I started with four pieces this time. I'm not that dumb. Because I want the pink to stick out from underneath, I cut each piece 1" shorter (that's 7", for the math challenged.)

The result:

Then glue or stitch the top bow onto the larger bottom bow.

Now add the barrette. Just hot glue it to be bottom-most large ribbon. (I switched this step and the next one - I put on the center button before I attached the barrette, and wound up with a button pointing sideways. Then I had to rip it apart and adjust. If you have a shaped button instead of just a round one, think about how you're laying this thing out before you glue. It doesn't actually matter what order you use here, as long as you think about the layout ahead of time. Not my strong suit.)

And now, ze button.

Lovely!
I'll be adding this and other new hair pretties to my Etsy shop soon. I'm not really sure how to post them, though. Right now I have all my barrettes in one posting, but that does make it hard to showcase unique pieces. However, I'll have to raise the price a little - probably 50 cents - to have individual listings. What do you think? What matters more - price or ease of browsing/buying?

And here's how I made it.
First, I measured out three pieces of the pink satin ribbon. I made some loops in my hand to get a general idea of how bit I wanted them. (This was maybe not the best idea. Stay tuned ...) Don't worry about making the edges nice; they won't show.


Mark the middle of each piece, and fold one side to the middle. You can stitch or hot glue it in place. I prefer hot glue, because while it's not important to have the edges be pretty, it is very important to have these folds lie perfectly straight. If you're at even a small angle, the bow will look wonky. I find it's easier to nail the loop in place with hot glue than with thread.

Repeat with the other side.

Except, my three-piece bow looks kind of sparse and depressing.

Time for one more ribbon.

Much better!
... Except for one thing. This bow is enormous. Way too big to put on somebody's head, especially if that somebody hasn't started reading chapter books yet.

I cut four new pieces, this time 8" long. Way better. Then I repeated the entire process above, but with my skulls ribbon. And I started with four pieces this time. I'm not that dumb. Because I want the pink to stick out from underneath, I cut each piece 1" shorter (that's 7", for the math challenged.)

The result:

Then glue or stitch the top bow onto the larger bottom bow.

Now add the barrette. Just hot glue it to be bottom-most large ribbon. (I switched this step and the next one - I put on the center button before I attached the barrette, and wound up with a button pointing sideways. Then I had to rip it apart and adjust. If you have a shaped button instead of just a round one, think about how you're laying this thing out before you glue. It doesn't actually matter what order you use here, as long as you think about the layout ahead of time. Not my strong suit.)

And now, ze button.

Lovely!
I'll be adding this and other new hair pretties to my Etsy shop soon. I'm not really sure how to post them, though. Right now I have all my barrettes in one posting, but that does make it hard to showcase unique pieces. However, I'll have to raise the price a little - probably 50 cents - to have individual listings. What do you think? What matters more - price or ease of browsing/buying?
Saturday, April 9, 2011
Ribbon Rose Tutorial - or, I'm Sick and Lazy
I'm good and sick this week. Unless you want a post on how to make three million cups of peppermint tea with honey, I don't have a whole lot to offer by way of my own crafty endeavors.
Instead, I'll share my favorite tutorial on making ribbon rosettes. I have several barrette and bobby pin designs in my shop with folded ribbon roses, and this was the tutorial that got me started. It's simple and vaguely cheesy, but it's very clear and easy to follow. Also, the narrator lady has the best prim-and-proper British accent EVAR.
One big difference - I recommend using hot glue to hold the rose together, instead of thread, at least for the outer few leaves. I can't find a good way to hide the threads and they annoy me.
Instead, I'll share my favorite tutorial on making ribbon rosettes. I have several barrette and bobby pin designs in my shop with folded ribbon roses, and this was the tutorial that got me started. It's simple and vaguely cheesy, but it's very clear and easy to follow. Also, the narrator lady has the best prim-and-proper British accent EVAR.
One big difference - I recommend using hot glue to hold the rose together, instead of thread, at least for the outer few leaves. I can't find a good way to hide the threads and they annoy me.
This is addictive! Happy folding.
Sunday, April 3, 2011
Is it time to garden yet? Pretty please?
Well, no. It's not. I know it's April, but it snowed last week. It's finally warming up here in the midwest, but I suspect it's just a tease, getting my hopes up.
But my hopes are indeed up, so at least I can get started making a plan for my beloved veggies. A garden plan might seem like extra work, but it really is important and will make your life easier. First of all, it's a good way to get you thinking about how many crops you can grow and how much space you have to dedicate to each; that way, you buy the right amount of seeds and starts. That saves you money. Secondly, it gives you a minute to think about how you're positioning your crops - so you don't put something that's going to be three feet high in front of something little and delicate. Higher yield! And finally, it's a super important part of pest control. By alternating where you put similar crops - not putting similar types next to each other, or in the same spot year after year - you go a long way toward deterring pests, without having to resort to pesticides. Hooray!
Here's what I have to work with:


Then I went to my fabulous local extension service. You have one too, and you should use them! They gave me a simple planting calendar; they will also help you do an inexpensive soil test so you know if your soil is safe and what nutrients it needs.

Then, I made a (very, very) simple garden plan!

Seriously, it doesn't have to be much more than that. As you can see, we've gotten adventurous and decided to add one more bed for a pumpkin patch. Because I LOVE PUMPKINS. LOVE. (More on this in October.)
When the garlic comes out in early summer, we'll replace one bed with cucumbers and one with peppers. We'll also see when one-off crops, like potatoes and rutabagas, come out - if we've harvested everything by mid-summer, we'll find some more yummies to add.
We'll draft this out nicely so we can still read it in a month, and we'll pick specific cultivars that thrive in our climate. Not all tomatoes are created equal - some types of any veggie will do well in your climate, and others won't. You can also select for other factors. Some types grow more quickly, some have larger fruit, some make nice neat bushes instead of big sprawling vines; some are resistant to certain pests. You get the idea. If you can get heirloom seeds, even better! I'll post about that selection process as we go.
I can't wait for big armloads of amazing veggies!!!

But my hopes are indeed up, so at least I can get started making a plan for my beloved veggies. A garden plan might seem like extra work, but it really is important and will make your life easier. First of all, it's a good way to get you thinking about how many crops you can grow and how much space you have to dedicate to each; that way, you buy the right amount of seeds and starts. That saves you money. Secondly, it gives you a minute to think about how you're positioning your crops - so you don't put something that's going to be three feet high in front of something little and delicate. Higher yield! And finally, it's a super important part of pest control. By alternating where you put similar crops - not putting similar types next to each other, or in the same spot year after year - you go a long way toward deterring pests, without having to resort to pesticides. Hooray!
Here's what I have to work with:

Each of those beds is about 4x8'. Raised beds rock because they create better drainage, help the soil warm up faster (a big deal if you live in short-summer climates), and allow you to add good-quality topsoil if your local soil isn't up to par.

See those green shoots on the left side? That's garlic we planted last fall. (Hopefully it will survive despite the fact that it's sprouted and frozen at least twice. I think we're gonna make it.) **Update: Less than five minutes after I posted this, the sky erupted in a MASSIVE hailstorm. Please hold on, little garlic sprouts! ** Last year's fall leaves have been a nice overwinter mulch.
We have a couple other small areas to plant. There's some chain link fence, which will be a nice trellis for peas and tomatoes:

And a sunny (if somewhat dilapidated - sorry - we rent) ledge for pots.


Then, I made a (very, very) simple garden plan!
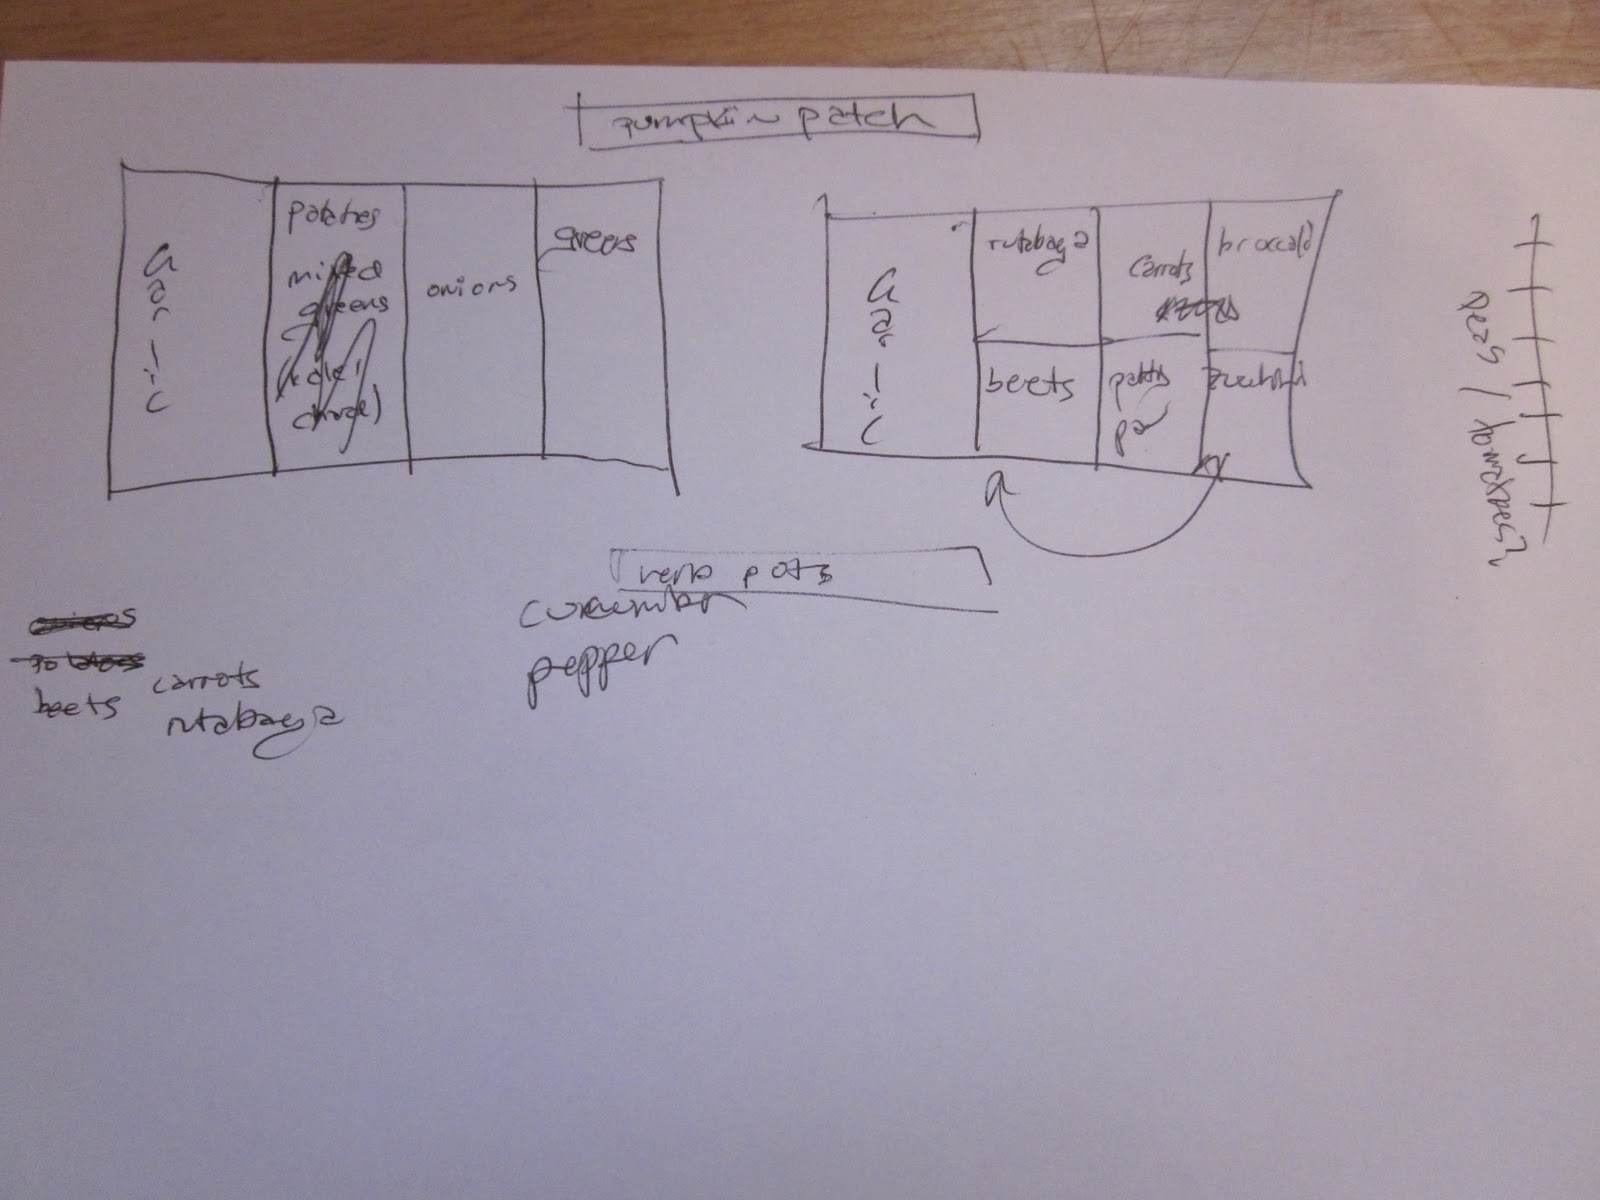
Seriously, it doesn't have to be much more than that. As you can see, we've gotten adventurous and decided to add one more bed for a pumpkin patch. Because I LOVE PUMPKINS. LOVE. (More on this in October.)
When the garlic comes out in early summer, we'll replace one bed with cucumbers and one with peppers. We'll also see when one-off crops, like potatoes and rutabagas, come out - if we've harvested everything by mid-summer, we'll find some more yummies to add.
We'll draft this out nicely so we can still read it in a month, and we'll pick specific cultivars that thrive in our climate. Not all tomatoes are created equal - some types of any veggie will do well in your climate, and others won't. You can also select for other factors. Some types grow more quickly, some have larger fruit, some make nice neat bushes instead of big sprawling vines; some are resistant to certain pests. You get the idea. If you can get heirloom seeds, even better! I'll post about that selection process as we go.
I can't wait for big armloads of amazing veggies!!!

Sunday, March 27, 2011
Best. Investment. Ever. (For coffee lovers, anyway)
I always thought that if you wanted fancy-schmancy cafe drinks at home - lattes, mochas, macchiatos - you would have to invest some serious cash. Professional-quality espresso machines, complete with foamers, steamers, and other alien-tentacle-esque appendages, are pricey and intimidating. Automatic machines with pods force you into buying nasty prepacked chemicals passing as coffee that cost as much as Starbucks anyway. Plus, I'm convinced that one day they are going to become sentient and take over the planet.
But, frou-frou coffee drinkers of the world, there is another way! Introducing .... the Moka pot.

Specifically, this is a Bialetti Moka Express 6-cup Stovetop Espresso Maker. It's cheap, simple, and requires only regular ground coffee and water. And it makes excellent espresso. In short, it is all your wildest coffee dreams come true.
My first experience brewing espresso in my shiny new Moka pot was made even more of an adventure by the fact that the instructions were apparently translated by somebody who speaks English as a fourth language. (My favorite example : "screw top of pot on strongly, but do not prize handle.")
So in plain English, the wonderment ...
Unscrew the bottom half of the pot.
 The strainer in the bottom half is just sitting; it comes out easily and reveals an empty well underneath. Fill that well with cold water. The instructions say cold. I don't know why. I just did it and it worked.

Then replace the strainer and fill with coarsely ground coffee.


 Pretty soon, the magical flow will slow to a trickle, then stop; the top will now be mostly full. Turn off the heat. Presto! Espresso!
If you just want to drink it straight, you're done. If you want a latte, read on ...
 Added the coffee:
 Top with more foam, and if you want, drizzle with chocolate!

Artsy photo, because I'm obsessed with how delicious my new mochas are:
 Seriously, this was just as good as anything I've gotten at a coffee shop, and I know my mad skillz will get better with practice. You can use your favorite coffee, so you can tailor it to your tastes; you can also try adding flavored syrups or playing with the ratio of steamed milk, foam, and coffee. Using the fuzziest of math, I figure for the $30 pot, if hubby and I replace mochas that cost $3.00 each at a coffee shop (and that's a low estimate), we'll break even after doing this just 5 times. And hopefully we'll use it for years!
Who knew a good investment could be so nummy?
But, frou-frou coffee drinkers of the world, there is another way! Introducing .... the Moka pot.

Specifically, this is a Bialetti Moka Express 6-cup Stovetop Espresso Maker. It's cheap, simple, and requires only regular ground coffee and water. And it makes excellent espresso. In short, it is all your wildest coffee dreams come true.
My first experience brewing espresso in my shiny new Moka pot was made even more of an adventure by the fact that the instructions were apparently translated by somebody who speaks English as a fourth language. (My favorite example : "screw top of pot on strongly, but do not prize handle.")
So in plain English, the wonderment ...
Unscrew the bottom half of the pot.


Then replace the strainer and fill with coarsely ground coffee.

Screw the top back on (securely, but remembering, of course, not to prize on the handle!) Then put it on low or medium heat - if you have a gas stove, make sure the flame is smaller in diameter than the bottom of the pot.

Ok, this is the part that is truly magical! The top half of the pot was completely empty when you put it on the stove, right? But as the pressure builds up, water is forced up through the grounds and into the top, like a fountain! A magical fountain of espresso!

If you just want to drink it straight, you're done. If you want a latte, read on ...
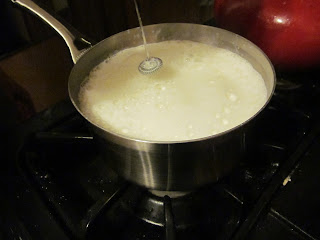
To steam and foam milk, we heated some milk up in a pot on the stove. (We used 7 oz milk to 3 oz espresso, based on a video recipe from Folgers.) Then we whipped it up with a little hand-held frother that we got in a hot cocoa kit last year. If you don't have one, they're inexpensive. I couldn't find the one we used exactly, but this one is the same brand to give you an idea. It's ten bucks from Amazon.

Hubby and I wanted mochas, so we added a little chocolate syrup to the bottom of each cup. Then we poured the milk:


Artsy photo, because I'm obsessed with how delicious my new mochas are:

Who knew a good investment could be so nummy?
Tuesday, March 22, 2011
Hamantaschen (that's the three-cornered Purim cookies, for the goyim)
What makes these cookies an adventure is that I only make them once a year. That's a lot of time to completely forget all the good tweaks I come up with every time, but naturally never write down. Plus, they take forever and are super-messy. All in all, a recipe for yummy, sticky insanity!
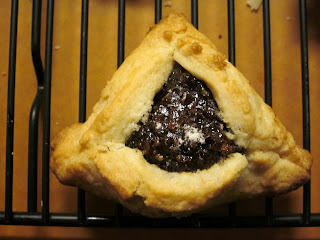
Essentially, these are a heavy dough, shaped into a triangle that holds a sweet filling, usually prune or poppy seed. The shape is meant to resemble the hat or pocket of Haman (boo! hiss!), the villain of the Purim story. The dough has to be very hearty (read: tons o' butter) in order to keep its shape and hold in all the fruity goodness. These are some serious cookies.
Anyway, I figure if it's a mitzvah (commandment / good deed) to share hamantaschen with my friends on Purim, I must get good-Jew points for sharing the recipe, too. This is from my Purple Book, aka the book of family recipes my mom put together for me when I went to college. It is my bible and you will see more of it!
Makes about 40 cookies.
Ingredients for dough: Ingredients for filling:
1c softened butter 1c pitted prunes
2c sugar 2/3c raisins
4 tsp baking powder 1/2c coconut
5c flour 2/3c chopped walnuts
4 tsp orange juice (I cut this in half and used
2 tsp vanilla store-bought fillings in other
flavors)
The dough is pretty simple to mix up - lots of butter, lots of flour, and a little orange juice for sweetness and moisture. It's the classic cookie technique - cream butter and sugar together, add eggs. Mix dry ingredients in a separate bowl. Alternate mixing in dry ingredients and OJ. Done! It does need to be refrigerated for half an hour at least. Since I forgot to get prunes for the filling, in this case "half an hour" meant "overnight, plus the time it takes me to get to Pick n' Save the next day."

After an eon in the fridge, the dough was pretty dried out and crumbly. I was worried for a few minutes, but a little extra juice and some water brought it right back. Hooray! Time for fillings!
I bought a couple of "pastry fillings". I don't really know what that means, but I couldn't find the prune butter my recipe called for. My mother confirmed that this will work as a substitute. Then I got fancy and decided to get 2 other flavors (just to use straight from the can, good lord I am not making 3 of these).

So the first thing to do is to rehydrate prunes and raisins. Put them in a pot, with enough water to cover. Bring to a boil, then turn down the heat and let them simmer for 5 minutes. I know, it looks a little gross and all that dried fruit makes you think of your Great-Grandma Myrtle. Don't worry. This will be DELICIOUS.

My recipe calls for blending things up in a specific order. I don't really worry about it and just dump everything in the food processor. You can also dice up your ingredients by hand. So in no particular order, add the prune butter, coconut, walnuts, and dried fruit.


Grind 'em up!

Until it looks like this:

And that's your filling. Taste it! It's sweet and sticky and deep and earthy. The hubs says too many walnuts. Note to self: less walnuts next year.
Now the real fun begins! Roll out the dough and cut out 3" circles.


I have not suddenly developed uber-manly hands. My husband is the family dough-roller-and-cutter. To the folding!
Add a teaspoon or so:
 Fold up the edges:

 Pinch for a good seal:
 Scoop out any extra.

At this point, you may be saying to yourself "that's easy! What's all the fuss about?" This cookie has the strange distinction of being quite simple - if you have unlimited counter space and three ovens. If not, a little creativity is now in order. Here's how we wound up:
 Yes, I'm balancing the cookie sheet on the flour container so my hubby has enough room to roll out the next portion of the dough. There's already a pan sitting on top of the oven, and one baking. Amazingly, nothing went flying. This time.
And that's not even taking into account the disaster area that used to be the rest of my kitchen:

Anywho, bake:

COOKIE TIME!

Normally I don't do a good enough job of sealing the ends, and one or two come open and spew fruity goo all over the cookie sheets. Apparently I was feeling particularly pinchy today, since even the ones that unfolded a little did not do so in a catastrophic manner.
Oh, and remember those store-bought fillings? The apricot and the cherry? Yeah ... me either. Well, actually, I did use all of the apricot. Cherry's not really a standard flavor for these, and I never did actually get around to using it. Expect a "what to do with leftover cherry goo" post one of these days.

Just a final laugh - "hamantaschen" has completely foiled Blogger's spell check. It keeps trying to change the word to "Schenectady." Sorry for any unintended New York references that crop up in this post.

Essentially, these are a heavy dough, shaped into a triangle that holds a sweet filling, usually prune or poppy seed. The shape is meant to resemble the hat or pocket of Haman (boo! hiss!), the villain of the Purim story. The dough has to be very hearty (read: tons o' butter) in order to keep its shape and hold in all the fruity goodness. These are some serious cookies.
Anyway, I figure if it's a mitzvah (commandment / good deed) to share hamantaschen with my friends on Purim, I must get good-Jew points for sharing the recipe, too. This is from my Purple Book, aka the book of family recipes my mom put together for me when I went to college. It is my bible and you will see more of it!
Makes about 40 cookies.
Ingredients for dough: Ingredients for filling:
1c softened butter 1c pitted prunes
2c sugar 2/3c raisins
4 tsp baking powder 1/2c coconut
5c flour 2/3c chopped walnuts
4 tsp orange juice (I cut this in half and used
2 tsp vanilla store-bought fillings in other
flavors)
The dough is pretty simple to mix up - lots of butter, lots of flour, and a little orange juice for sweetness and moisture. It's the classic cookie technique - cream butter and sugar together, add eggs. Mix dry ingredients in a separate bowl. Alternate mixing in dry ingredients and OJ. Done! It does need to be refrigerated for half an hour at least. Since I forgot to get prunes for the filling, in this case "half an hour" meant "overnight, plus the time it takes me to get to Pick n' Save the next day."

After an eon in the fridge, the dough was pretty dried out and crumbly. I was worried for a few minutes, but a little extra juice and some water brought it right back. Hooray! Time for fillings!
I bought a couple of "pastry fillings". I don't really know what that means, but I couldn't find the prune butter my recipe called for. My mother confirmed that this will work as a substitute. Then I got fancy and decided to get 2 other flavors (just to use straight from the can, good lord I am not making 3 of these).

So the first thing to do is to rehydrate prunes and raisins. Put them in a pot, with enough water to cover. Bring to a boil, then turn down the heat and let them simmer for 5 minutes. I know, it looks a little gross and all that dried fruit makes you think of your Great-Grandma Myrtle. Don't worry. This will be DELICIOUS.

My recipe calls for blending things up in a specific order. I don't really worry about it and just dump everything in the food processor. You can also dice up your ingredients by hand. So in no particular order, add the prune butter, coconut, walnuts, and dried fruit.


Grind 'em up!

Until it looks like this:

And that's your filling. Taste it! It's sweet and sticky and deep and earthy. The hubs says too many walnuts. Note to self: less walnuts next year.
Now the real fun begins! Roll out the dough and cut out 3" circles.


I have not suddenly developed uber-manly hands. My husband is the family dough-roller-and-cutter. To the folding!
Add a teaspoon or so:


At this point, you may be saying to yourself "that's easy! What's all the fuss about?" This cookie has the strange distinction of being quite simple - if you have unlimited counter space and three ovens. If not, a little creativity is now in order. Here's how we wound up:

And that's not even taking into account the disaster area that used to be the rest of my kitchen:

Anywho, bake:

COOKIE TIME!

Normally I don't do a good enough job of sealing the ends, and one or two come open and spew fruity goo all over the cookie sheets. Apparently I was feeling particularly pinchy today, since even the ones that unfolded a little did not do so in a catastrophic manner.
Oh, and remember those store-bought fillings? The apricot and the cherry? Yeah ... me either. Well, actually, I did use all of the apricot. Cherry's not really a standard flavor for these, and I never did actually get around to using it. Expect a "what to do with leftover cherry goo" post one of these days.

Just a final laugh - "hamantaschen" has completely foiled Blogger's spell check. It keeps trying to change the word to "Schenectady." Sorry for any unintended New York references that crop up in this post.
Subscribe to:
Posts (Atom)