
Tuesday, April 26, 2011
Pink Skulls Double-Decker Hairbow Now Available!
I finally got the pink skull ribbon bow barrette from the post Sugar, Spice, and Skulls up on Etsy! Buy it before it goes - it's one of a kind! (More cute ribbons in a similar design to come.) Check it out!
Saturday, April 23, 2011
Sushi!
Tonight's adventure: sushi! We cracked out the wedding-gift sushi set (only a year and a half later ...) and got to it. The hubs and I have been dreaming about hosting sushi parties, so we figured step 1 was actually figuring out how to make it. And you know what? It's ridiculously easy.
One caveat, for the sushi gourmet - when I say "sushi", I mean "maki rolls." More specifically, I mean maki rolls made without any raw fish. I love raw fish in my maki at very high-quality restaurants, but I just doubt that I can get and safely work with sushi-grade fish when I'm 2000 miles from the ocean.
So, anyway, veggie maki rolls are really easy!
We hauled out the bamboo mat, which I thought would be hard to work with but wasn't. Our mystery sources (i.e. YouTube) recommended covering the mat in plastic wrap to minimize sticking. Sticky sushi rice is really, seriously sticky. Who would have thought.
Then lay out a sheet of seaweed. We got some really nice nori at the local co-op. My husband swears everything there is organic, although I'm skeptical about the existence of certified organic seaweed. Apparently darker color = better quality. (Thanks again, YouTube.)


Fill a small bowl with water and get your hands wet. This is by far the most important step if you don't want to wind up with sushi rice stuck all over EVERYTHING. Then, with wet hands, grab a hunk of your prepared sushi rice (we used this recipe from Alton Brown) and press it firmly into your nori.


 Go pretty much all the way to the edges, but leave a little space - maybe half an inch or so - at the end, so you won't squish rice out the end when you make the roll.
Place fillings at one end (we made cucumber roll for me, and Philadelphia roll - cream cheese and lox - for the hubby.)
 Then roll! Your first roll you need to move somewhat quickly - don't rush, just don't hesitate. You're trying to completely enclose the fillings. After you roll, make the roll tight by squeezing the bamboo mat at the bottom of the new roll (where my fingers are in the pic below.)

Repeat until you're all the way at the edge ...

Then lift the mat away, and voila! It's like magic!

To make eight even pieces (we tried six the first time, and the pieces were HUGE. We couldn't fit them in our mouths. This resulted in some hilarious photos of my hubby with half a piece hanging out of his mouth, which I will not be sharing because I like being married.) Anywho, to make eight even pieces, we're going to cut the roll in half several times. Use a wet knife to avoid sticking! First cut it in half once and line the halves up.


 Ta-dah!


One caveat, for the sushi gourmet - when I say "sushi", I mean "maki rolls." More specifically, I mean maki rolls made without any raw fish. I love raw fish in my maki at very high-quality restaurants, but I just doubt that I can get and safely work with sushi-grade fish when I'm 2000 miles from the ocean.
So, anyway, veggie maki rolls are really easy!
We hauled out the bamboo mat, which I thought would be hard to work with but wasn't. Our mystery sources (i.e. YouTube) recommended covering the mat in plastic wrap to minimize sticking. Sticky sushi rice is really, seriously sticky. Who would have thought.
Then lay out a sheet of seaweed. We got some really nice nori at the local co-op. My husband swears everything there is organic, although I'm skeptical about the existence of certified organic seaweed. Apparently darker color = better quality. (Thanks again, YouTube.)


Place fillings at one end (we made cucumber roll for me, and Philadelphia roll - cream cheese and lox - for the hubby.)


Repeat until you're all the way at the edge ...

Then lift the mat away, and voila! It's like magic!

To make eight even pieces (we tried six the first time, and the pieces were HUGE. We couldn't fit them in our mouths. This resulted in some hilarious photos of my hubby with half a piece hanging out of his mouth, which I will not be sharing because I like being married.) Anywho, to make eight even pieces, we're going to cut the roll in half several times. Use a wet knife to avoid sticking! First cut it in half once and line the halves up.

Then...


(Note that these are the first batch of uber-huge rolls. That's why they're already starting to unroll - the small ones, which we cut smaller and used less rice for, held together much better.)
It looks beautiful like this for a few minutes, but then it's so nummy that it will shortly look like this:

Sunday, April 17, 2011
Sugar, Spice, and Skulls
I just got a stash of THE MOST ADORABLE ribbon from one of my fave Etsy sellers, chickadee supplies. (That means you'll probably be seeing several posts in which I try to find the best possible project for my lovelies.) This pink and gray skulls pattern inspired me to make a double-decker hairbow. So here it is!

And here's how I made it.
First, I measured out three pieces of the pink satin ribbon. I made some loops in my hand to get a general idea of how bit I wanted them. (This was maybe not the best idea. Stay tuned ...) Don't worry about making the edges nice; they won't show.


Mark the middle of each piece, and fold one side to the middle. You can stitch or hot glue it in place. I prefer hot glue, because while it's not important to have the edges be pretty, it is very important to have these folds lie perfectly straight. If you're at even a small angle, the bow will look wonky. I find it's easier to nail the loop in place with hot glue than with thread.

Repeat with the other side.
 Then do it again with the remaining pieces. Once they're all done, you can glue or stitch them together. Make sure to keep the glued/stitched edges facing the same way (all up or all down.) That way, you can hide them all on the bottom later.
Except, my three-piece bow looks kind of sparse and depressing.

Time for one more ribbon.

Much better!
... Except for one thing. This bow is enormous. Way too big to put on somebody's head, especially if that somebody hasn't started reading chapter books yet.
 It's way bigger than the spool of ribbon, and almost as big as my scissors. Oops.
I cut four new pieces, this time 8" long. Way better. Then I repeated the entire process above, but with my skulls ribbon. And I started with four pieces this time. I'm not that dumb. Because I want the pink to stick out from underneath, I cut each piece 1" shorter (that's 7", for the math challenged.)

The result:

Then glue or stitch the top bow onto the larger bottom bow.

Now add the barrette. Just hot glue it to be bottom-most large ribbon. (I switched this step and the next one - I put on the center button before I attached the barrette, and wound up with a button pointing sideways. Then I had to rip it apart and adjust. If you have a shaped button instead of just a round one, think about how you're laying this thing out before you glue. It doesn't actually matter what order you use here, as long as you think about the layout ahead of time. Not my strong suit.)

And now, ze button.

Lovely!
I'll be adding this and other new hair pretties to my Etsy shop soon. I'm not really sure how to post them, though. Right now I have all my barrettes in one posting, but that does make it hard to showcase unique pieces. However, I'll have to raise the price a little - probably 50 cents - to have individual listings. What do you think? What matters more - price or ease of browsing/buying?

And here's how I made it.
First, I measured out three pieces of the pink satin ribbon. I made some loops in my hand to get a general idea of how bit I wanted them. (This was maybe not the best idea. Stay tuned ...) Don't worry about making the edges nice; they won't show.


Mark the middle of each piece, and fold one side to the middle. You can stitch or hot glue it in place. I prefer hot glue, because while it's not important to have the edges be pretty, it is very important to have these folds lie perfectly straight. If you're at even a small angle, the bow will look wonky. I find it's easier to nail the loop in place with hot glue than with thread.

Repeat with the other side.

Except, my three-piece bow looks kind of sparse and depressing.

Time for one more ribbon.

Much better!
... Except for one thing. This bow is enormous. Way too big to put on somebody's head, especially if that somebody hasn't started reading chapter books yet.

I cut four new pieces, this time 8" long. Way better. Then I repeated the entire process above, but with my skulls ribbon. And I started with four pieces this time. I'm not that dumb. Because I want the pink to stick out from underneath, I cut each piece 1" shorter (that's 7", for the math challenged.)

The result:

Then glue or stitch the top bow onto the larger bottom bow.

Now add the barrette. Just hot glue it to be bottom-most large ribbon. (I switched this step and the next one - I put on the center button before I attached the barrette, and wound up with a button pointing sideways. Then I had to rip it apart and adjust. If you have a shaped button instead of just a round one, think about how you're laying this thing out before you glue. It doesn't actually matter what order you use here, as long as you think about the layout ahead of time. Not my strong suit.)

And now, ze button.

Lovely!
I'll be adding this and other new hair pretties to my Etsy shop soon. I'm not really sure how to post them, though. Right now I have all my barrettes in one posting, but that does make it hard to showcase unique pieces. However, I'll have to raise the price a little - probably 50 cents - to have individual listings. What do you think? What matters more - price or ease of browsing/buying?
Saturday, April 9, 2011
Ribbon Rose Tutorial - or, I'm Sick and Lazy
I'm good and sick this week. Unless you want a post on how to make three million cups of peppermint tea with honey, I don't have a whole lot to offer by way of my own crafty endeavors.
Instead, I'll share my favorite tutorial on making ribbon rosettes. I have several barrette and bobby pin designs in my shop with folded ribbon roses, and this was the tutorial that got me started. It's simple and vaguely cheesy, but it's very clear and easy to follow. Also, the narrator lady has the best prim-and-proper British accent EVAR.
One big difference - I recommend using hot glue to hold the rose together, instead of thread, at least for the outer few leaves. I can't find a good way to hide the threads and they annoy me.
This is addictive! Happy folding.
Sunday, April 3, 2011
Is it time to garden yet? Pretty please?
Well, no. It's not. I know it's April, but it snowed last week. It's finally warming up here in the midwest, but I suspect it's just a tease, getting my hopes up.
But my hopes are indeed up, so at least I can get started making a plan for my beloved veggies. A garden plan might seem like extra work, but it really is important and will make your life easier. First of all, it's a good way to get you thinking about how many crops you can grow and how much space you have to dedicate to each; that way, you buy the right amount of seeds and starts. That saves you money. Secondly, it gives you a minute to think about how you're positioning your crops - so you don't put something that's going to be three feet high in front of something little and delicate. Higher yield! And finally, it's a super important part of pest control. By alternating where you put similar crops - not putting similar types next to each other, or in the same spot year after year - you go a long way toward deterring pests, without having to resort to pesticides. Hooray!
Here's what I have to work with:


Then I went to my fabulous local extension service. You have one too, and you should use them! They gave me a simple planting calendar; they will also help you do an inexpensive soil test so you know if your soil is safe and what nutrients it needs.

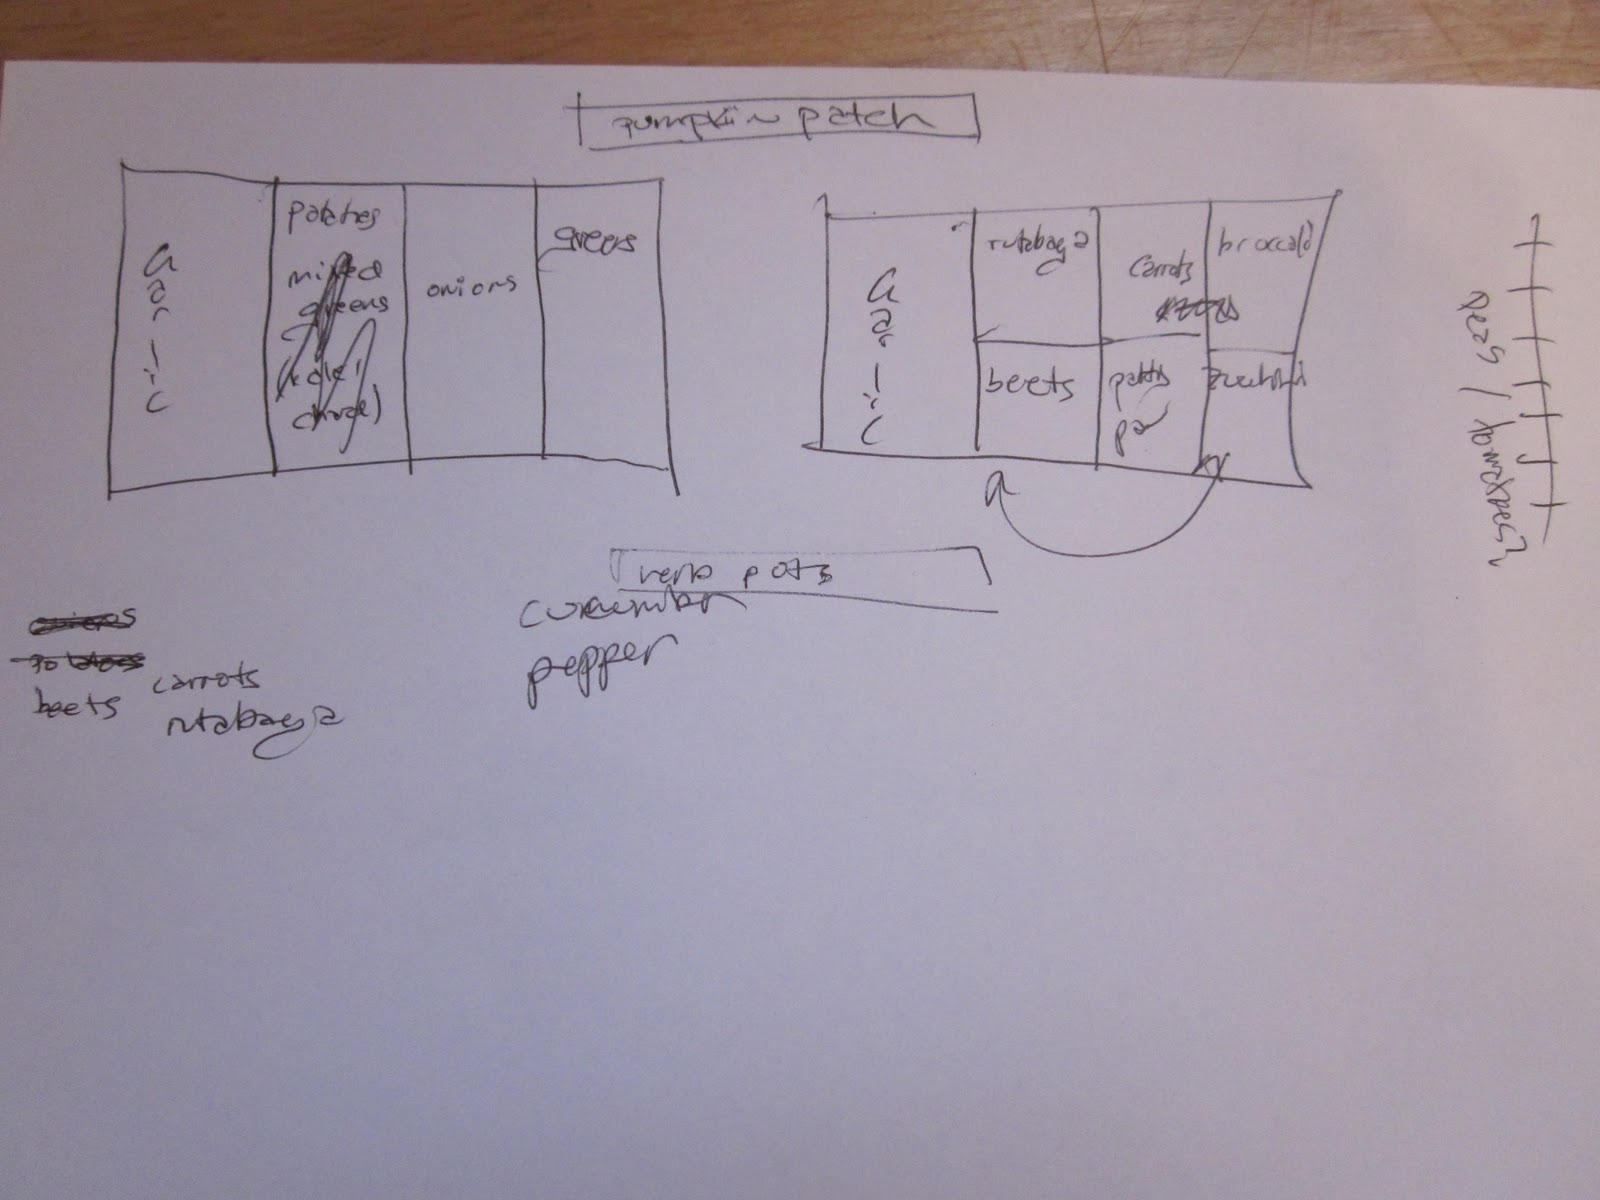
Then, I made a (very, very) simple garden plan!

Seriously, it doesn't have to be much more than that. As you can see, we've gotten adventurous and decided to add one more bed for a pumpkin patch. Because I LOVE PUMPKINS. LOVE. (More on this in October.)
When the garlic comes out in early summer, we'll replace one bed with cucumbers and one with peppers. We'll also see when one-off crops, like potatoes and rutabagas, come out - if we've harvested everything by mid-summer, we'll find some more yummies to add.
We'll draft this out nicely so we can still read it in a month, and we'll pick specific cultivars that thrive in our climate. Not all tomatoes are created equal - some types of any veggie will do well in your climate, and others won't. You can also select for other factors. Some types grow more quickly, some have larger fruit, some make nice neat bushes instead of big sprawling vines; some are resistant to certain pests. You get the idea. If you can get heirloom seeds, even better! I'll post about that selection process as we go.
I can't wait for big armloads of amazing veggies!!!

But my hopes are indeed up, so at least I can get started making a plan for my beloved veggies. A garden plan might seem like extra work, but it really is important and will make your life easier. First of all, it's a good way to get you thinking about how many crops you can grow and how much space you have to dedicate to each; that way, you buy the right amount of seeds and starts. That saves you money. Secondly, it gives you a minute to think about how you're positioning your crops - so you don't put something that's going to be three feet high in front of something little and delicate. Higher yield! And finally, it's a super important part of pest control. By alternating where you put similar crops - not putting similar types next to each other, or in the same spot year after year - you go a long way toward deterring pests, without having to resort to pesticides. Hooray!
Here's what I have to work with:

Each of those beds is about 4x8'. Raised beds rock because they create better drainage, help the soil warm up faster (a big deal if you live in short-summer climates), and allow you to add good-quality topsoil if your local soil isn't up to par.

See those green shoots on the left side? That's garlic we planted last fall. (Hopefully it will survive despite the fact that it's sprouted and frozen at least twice. I think we're gonna make it.) **Update: Less than five minutes after I posted this, the sky erupted in a MASSIVE hailstorm. Please hold on, little garlic sprouts! ** Last year's fall leaves have been a nice overwinter mulch.
We have a couple other small areas to plant. There's some chain link fence, which will be a nice trellis for peas and tomatoes:

And a sunny (if somewhat dilapidated - sorry - we rent) ledge for pots.


Then, I made a (very, very) simple garden plan!
Seriously, it doesn't have to be much more than that. As you can see, we've gotten adventurous and decided to add one more bed for a pumpkin patch. Because I LOVE PUMPKINS. LOVE. (More on this in October.)
When the garlic comes out in early summer, we'll replace one bed with cucumbers and one with peppers. We'll also see when one-off crops, like potatoes and rutabagas, come out - if we've harvested everything by mid-summer, we'll find some more yummies to add.
We'll draft this out nicely so we can still read it in a month, and we'll pick specific cultivars that thrive in our climate. Not all tomatoes are created equal - some types of any veggie will do well in your climate, and others won't. You can also select for other factors. Some types grow more quickly, some have larger fruit, some make nice neat bushes instead of big sprawling vines; some are resistant to certain pests. You get the idea. If you can get heirloom seeds, even better! I'll post about that selection process as we go.
I can't wait for big armloads of amazing veggies!!!

Subscribe to:
Posts (Atom)