Wabi-Whatnow?

Wabi-sabi is a Japanese philosophy that embraces the imperfect, ephemeral, and incomplete. I'm always screwing something up, but it often comes out more beautiful, more instructive, and more fun for it. Come make mistakes with me!

Sunday, March 27, 2011

Best. Investment. Ever. (For coffee lovers, anyway)

I always thought that if you wanted fancy-schmancy cafe drinks at home - lattes, mochas, macchiatos - you would have to invest some serious cash.  Professional-quality espresso machines, complete with foamers, steamers, and other alien-tentacle-esque appendages, are pricey and intimidating.  Automatic machines with pods force you into buying nasty prepacked chemicals passing as coffee that cost as much as Starbucks anyway. Plus, I'm convinced that one day they are going to become sentient and take over the planet.

But, frou-frou coffee drinkers of the world, there is another way!  Introducing .... the Moka pot.


Specifically, this is a Bialetti Moka Express 6-cup Stovetop Espresso Maker.  It's cheap, simple, and requires only regular ground coffee and water.  And it makes excellent espresso.  In short, it is all your wildest coffee dreams come true. 

My first experience brewing espresso in my shiny new Moka pot was made even more of an adventure by the fact that the instructions were apparently translated by somebody who speaks English as a fourth language. (My favorite example : "screw top of pot on strongly, but do not prize handle.")

So in plain English, the wonderment ...

Unscrew the bottom half of the pot.

The strainer in the bottom half is just sitting; it comes out easily and reveals an empty well underneath.  Fill that well with cold water.  The instructions say cold.  I don't know why.  I just did it and it worked.


Then replace the strainer and fill with coarsely ground coffee.

Screw the top back on (securely, but remembering, of course, not to prize on the handle!)  Then put it on low or medium heat - if you have a gas stove, make sure the flame is smaller in diameter than the bottom of the pot.


Ok, this is the part that is truly magical!  The top half of the pot was completely empty when you put it on the stove, right?  But as the pressure builds up, water is forced up through the grounds and into the top, like a fountain!  A magical fountain of espresso!  
Pretty soon, the magical flow will slow to a trickle, then stop; the top will now be mostly full.  Turn off the heat.  Presto! Espresso!

If you just want to drink it straight, you're done.  If you want a latte, read on ...

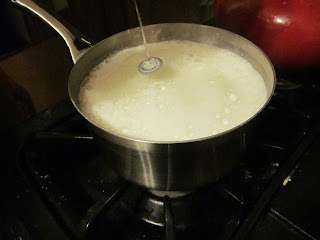
To steam and foam milk, we heated some milk up in a pot on the stove.  (We used 7 oz milk to 3 oz espresso, based on a video recipe from Folgers.) Then we whipped it up with a little hand-held frother that we got in a hot cocoa kit last year.  If you don't have one, they're inexpensive.  I couldn't find the one we used exactly, but this one is the same brand to give you an idea. It's ten bucks from Amazon.


Hubby and I wanted mochas, so we added a little chocolate syrup to the bottom of each cup.  Then we poured the milk:
Added the coffee:
Top with more foam, and if you want, drizzle with chocolate!


 Artsy photo, because I'm obsessed with how delicious my new mochas are:
Seriously, this was just as good as anything I've gotten at a coffee shop, and I know my mad skillz will get better with practice.  You can use your favorite coffee, so you can tailor it to your tastes; you can also try adding flavored syrups or playing with the ratio of steamed milk, foam, and coffee.  Using the fuzziest of math, I figure for the $30 pot, if hubby and I replace mochas that cost $3.00 each at a coffee shop (and that's a low estimate), we'll break even after doing this just 5 times.  And hopefully we'll use it for years!

Who knew a good investment could be so nummy? 

Tuesday, March 22, 2011

Hamantaschen (that's the three-cornered Purim cookies, for the goyim)

What makes these cookies an adventure is that I only make them once a year.  That's a lot of time to completely forget all the good tweaks I come up with every time, but naturally never write down.  Plus, they take forever and are super-messy.  All in all, a recipe for yummy, sticky insanity!


Essentially, these are a heavy dough, shaped into a triangle that holds a sweet filling, usually prune or poppy seed.  The shape is meant to resemble the hat or pocket of Haman (boo! hiss!), the villain of the Purim story.  The dough has to be very hearty (read: tons o' butter) in order to keep its shape and hold in all the fruity goodness.  These are some serious cookies.

Anyway, I figure if it's a mitzvah (commandment / good deed) to share hamantaschen with my friends on Purim, I must get good-Jew points for sharing the recipe, too.  This is from my Purple Book, aka the book of family recipes my mom put together for me when I went to college.  It is my bible and you will see more of it!

Makes about 40 cookies.

Ingredients for dough:                                       Ingredients for filling:
1c softened butter                                            1c pitted prunes
2c sugar                                                           2/3c raisins  
4 tsp baking powder                                        1/2c coconut
5c flour                                                            2/3c chopped walnuts
4 tsp orange juice                                             (I cut this in half and used
2 tsp vanilla                                                      store-bought fillings in other
                                                                        flavors)


The dough is pretty simple to mix up - lots of butter, lots of flour, and a little orange juice for sweetness and moisture.  It's the classic cookie technique - cream butter and sugar together, add eggs. Mix dry ingredients in a separate bowl.  Alternate mixing in dry ingredients and OJ.  Done!  It does need to be refrigerated for half an hour at least.  Since I forgot to get prunes for the filling, in this case "half an hour" meant "overnight, plus the time it takes me to get to Pick n' Save the next day."


After an eon in the fridge, the dough was pretty dried out and crumbly.  I was worried for a few minutes, but a little extra juice and some water brought it right back.  Hooray!  Time for fillings!

I bought a couple of "pastry fillings".  I don't really know what that means, but I couldn't find the prune butter my recipe called for.  My mother confirmed that this will work as a substitute.  Then I got fancy and decided to get 2 other flavors (just to use straight from the can, good lord I am not making 3 of these).


So the first thing to do is to rehydrate prunes and raisins.  Put them in a pot, with enough water to cover.  Bring to a boil, then turn down the heat and let them simmer for 5 minutes.  I know, it looks a little gross and all that dried fruit makes you think of your Great-Grandma Myrtle.  Don't worry.  This will be DELICIOUS.


 My recipe calls for blending things up in a specific order.  I don't really worry about it and just dump everything in the food processor. You can also dice up your ingredients by hand. So in no particular order, add the prune butter, coconut, walnuts, and dried fruit.


Grind 'em up!


 Until it looks like this:


And that's your filling.  Taste it!  It's sweet and sticky and deep and earthy.  The hubs says too many walnuts.  Note to self: less walnuts next year.

Now the real fun begins! Roll out the dough and cut out 3" circles.


I have not suddenly developed uber-manly hands.  My husband is the family dough-roller-and-cutter. To the folding!

Add a teaspoon or so:

Fold up the edges:


 Pinch for a good seal:

 Scoop out any extra.

At this point, you may be saying to yourself "that's easy! What's all the fuss about?"  This cookie has the strange distinction of being quite simple - if you have unlimited counter space and three ovens.  If not, a little creativity is now in order.  Here's how we wound up:

Yes, I'm balancing the cookie sheet on the flour container so my hubby has enough room to roll out the next portion of the dough.  There's already a pan sitting on top of the oven, and one baking.  Amazingly, nothing went flying.  This time.

And that's not even taking into account the disaster area that used to be the rest of my kitchen:


Anywho, bake:

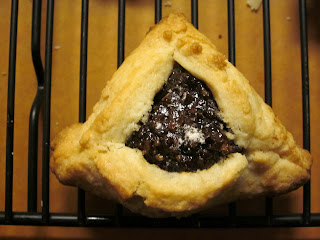
COOKIE TIME!

Normally I don't do a good enough job of sealing the ends, and one or two come open and spew fruity goo all over the cookie sheets. Apparently I was feeling particularly pinchy today, since even the ones that unfolded a little did not do so in a catastrophic manner.

Oh, and remember those store-bought fillings? The apricot and the cherry?  Yeah ... me either.  Well, actually, I did use all of the apricot.  Cherry's not really a standard flavor for these, and I never did actually get around to using it.  Expect a "what to do with leftover cherry goo" post one of these days.


Just a final laugh - "hamantaschen" has completely foiled Blogger's spell check.  It keeps trying to change the word to "Schenectady." Sorry for any unintended New York references that crop up in this post.

Sunday, March 20, 2011

Tutorial : Knitted Hair Bows

I love textiles.  Ribbons, fabric, yarns - you name it, I can waste two hours coveting it.  The problem is that, except for yarn, I don't really know what the heck to do with the stuff.  I'm just starting to learn to use my sewing machine (more posts on Me vs the Machine to come), and I just couldn't think of anything to do with ribbons.

So I started making hair pretties!  Check out my Etsy shop to see my barrettes and bobby pins.

I never thought of using my knitting chops to make hair doohickeys until my friend posted this pic on Facebook:


And lo and behold, I thought "I can do that!" Cue the looming-disaster music.  Actually, taking a close look made me realize that a knitted hairbow is really just a rectangle tied around the middle.  What could be easier?

So I knitted a rectangle out of pretty yarn (Noro Kureyon, for the curious):

 
Pinched it in the middle:

 And wrapped around the middle to anchor it.

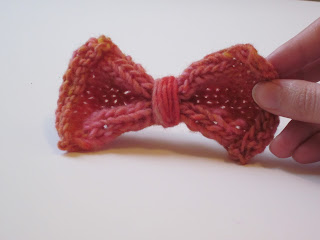
Voila! Bow!


But can I be happy with moderate success?  Of course not.  I had decided to cast on at the short end, but the sides of my test bow looked a little sloppy.  So I switched to a slipped stitch edge to make the sides neater.  (This just means I slipped the first stitch of each row purlwise, rather than working it in pattern.) 

Then I thought, why not try casting on the long edge?  I think too much sometimes.  Bad idea.


Sitting back to admire my handiwork on a chunkier bow (Spud & Chloe yarn), I realized that the original picture looks more like the purl side than the knit.  So I flipped the bow around, and I liked that even better! Yay!

Then just for kicks I decided to make a tiny bow on sock yarn.  (Atacama alpaca ..love!)  And this way by far my favorite, and will be available for sale as a clippie / ponytail holder on my Etsy shop - as soon as I get around to buying some clippies or elastics.  Keep an eye out for it! 


Have you tried knitting or crocheting hairbows?  Share a link and your advice!

Sunday, March 13, 2011

I can do that!

Since moving halfway across the country to start a new job (hooray for superhero public librarians!), I've found myself looking for a new creative outlet.  I don't know many people and I haven't re-established ties to most of the ways I used to expend my creative energy - a good yoga class, a choir, a regular swing dance venue, a writing group, or even just a circle of crafty friends.  So I've gotten the itch to try new things on my own. 

I sort of decided to tackle recipes, candles, bath products, knitted items, and hair accessories ... simultaneously.

See, here's how my brain works:
Step 1. I see something I like.  Maybe it's on Etsy, or in a magazine, or a blog, or in your house.
Step 2.  I think "I can do that!"
Step 3. Mayhem ensues, occasionally result in creating the thing I wanted in the first place.

As you can imagine, this results in a lot of error for my trial.  After a batch of bath fizzies literally exploded all over my kitchen, I realized I really, really wished I had been taking pictures of this stuff.  I mean, you probably only get to blow up pink grapefruit goo once in your life. (Believe me, you only want to clean it up once ...)

So I'll be sharing my misadventures in the kitchen, craft room, and, should the midwest ever decide to thaw out, vegetable garden. I'll take pictures of my successes and failures, post tips and tricks, and link to the best tutorials and guides I can find.  That way, you won't make my mistakes - you can make your own.